70dB (50kHz-300MHz), 50dB (300M-600MHz), 40dB (600M-900MHz)< 1.1< 0.5ppm602035 3.7V 350mAh 20x35x6mmK1-1502SAType C except for Micro-USB B on white gekkos.One LED (between USB and power switch) blinks @ 1/2Hz while charging,
then illuminates constantly;
- remaining on for 40 seconds after disconnecting USB or powering off,
perhaps discharging capacitors?
Another LED, between power switch and multi-directional switch,
illuminates while nanoLED is powered;
- this may be vestigal from nanoVNA prototypes lackng LCD displays.
Pressing this launches menu or selects menu item;
nudging left or right migrates among menu items or moves selected marker.
PDF @ groups.io thanks to Larry Goga
thanks to Alan Victor
A second 50 ohm termination and female-female SMA adapter are wanted for ISOLN and THRU calibration.
Supplied and used are TWO matched cables, LOADS and one SMA adapter.
Each NUMBERED step below represents your PRESS (SOFT KEY TOUCH).
Turn on the VNA and note register 0 is ON.
CONNECT MATCHED CABLES to CH0 and CH1.
S11 and S22 both display ONLY as LOGMAG.That's it. Check that the open, short and 50 ohm display properly.
Note, the cables are CONNECTED to CH0 and CH1a,
and calibration reference plane is at those cables ends.
However, phase is subject to error and needs addressing in another message.
Also, with SMA coupler connecting cables to CH0 and CH1,
S21 should measure nearly 0dB.
thanks to Larry Rothman:
For best behavior, nanoVNA devices need touchscreen calibraton,
which requires USB connection to your PC/MAC/Terminal.
touchcal saveconfig
Config saved
You can verify touch calibration using the menu boxes.
NOTE: saveconfig command probably also saves calibration data
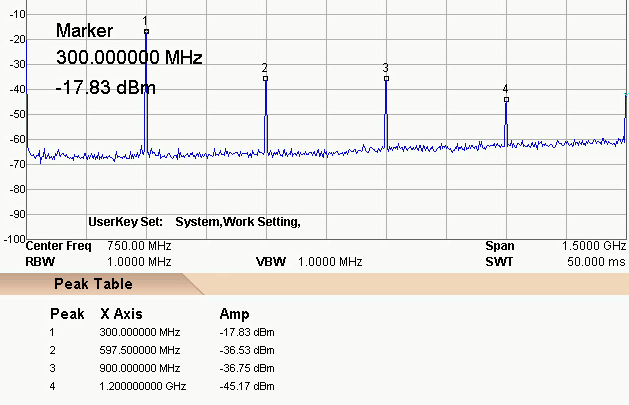
300MHz, 600MHz spikesSome nanoVNAs fail when overclocked to 300MHz by standard firmware;
nanoVNA_800aa*.dfu firmware for reflashing problematic devices.
firmware versions & installation
Here are Console Commands command instability workaround

300MHz, nanoVNA boosts Si5351 output and uses its 3rd harmonic.Si5351 internal VCO (Voltage Controlled Oscillator) maximumSi5351 specified maximum is 900MHz for a divide-by-4-frequency of 225MHz.300MHz output, VCOs are overclocked to 1200MHz, which some cannot.0dB) at 300MHz or 900MHz,800MHz firmware is recommended.Somewhat as described in Michael Knitter DG5MK's YouTube video:
Hamradio 2018 FA-VA5 presentation-UK
Instead of nanoVNA's SA612 mixer
(also used by EU1KY analyzer),
the FA-VA5 uses 74LVC4066 analog switches
Analog switch ICs have better linearity, dynamic range and GHz bandwidths,
but switching times > 1ns limit local oscillators to 200MHz or so..
5kHz intermediate frequency (IF) for Analog-to-Digital-Conversion (ADC).5KHz IF to DC (eliminating mirror signal),10kHz. No need for other filters.
In addition to selecting values to be displayed,
CHANNEL submenu selects whether signals are from CH0 (TX) or CH1 (RX).
Up to 4 simultaneous color-coded data can be plotted.
Some firmware instead supports only 2.
OFF disables this trace; SINGLE disables all other traces...?
defaults to 10dB/dev for some DISPLAY FORMATs; I prefer 15dB/div
Numerical input seems a bit flaky,
although it works better for e.g. CW frequency than position.
Touchscreen typically wants calibration.
Antenna analyser firmware has a larger font;
touchscreen [mis]calibration is more critical for other firmware..
0.01dB,10dB higher.100Hz.900MHz antenna analyser firmware,800MHz you can enter 0.8G, 800M or 800000k.)
Calibration data can be modified by electrical delay in picoseconds.
Hugen customized short and accurate calibrations kits.
While displayed markers can in theory be manipulated by hand or stylus,
touch calibration inaccuracy typically frustrates that.
Better to use the multi-directional switch..
.. or try the touchscreen calibration procedure.
SELECT MARKER
Select (by push) any of MARKER 1 - 4.
Selecting that same marker again toggles it off.
Sliding the multi-directional switch moves a selected marker.
A selected marker can change START, STOP or CENTER of sweeps.
SPAN changes sweeps when 2 markers are active.
This button freezes data collection.
thanks to Gary O'Neil:
The nanoVNA must remain powered on to successfully capture data via USB.
With the data you wish to 'save' and port to your workstation,
navigate to STIMULUS > PAUSE SWEEP.
Data at the top of the screen will freeze, confirming sweep is paused.
Take care to not inadvertently alter the current state...
either by the toggle switch or touchscreen.
Remove the NanoVNA from the DUT,
observe that the desired data remains on the display,
transport it to your workstation, hotplug the device into a USB port,
then tap on the display a couple of times.
This appears to initiate handshaking
and establishes a connection with the workstation.
To be clear, data is not otherwise saved within the NanoVNA.
Once PAUSE is cancelled or the nanoVNA is power cycled,
data is flushed and replaced.